A PZIOT-E02 kétféle helyzetben adhat hatalmas segítséget:
1. Ha nincs P1 portos villanyórád
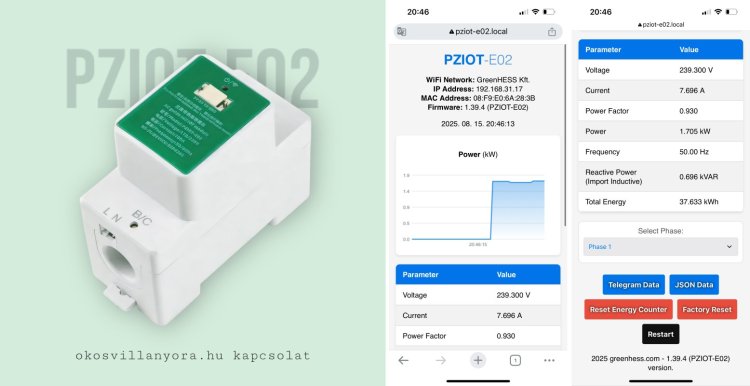
Ilyenkor a PZIOT-E02 önálló fázismérőként működik.
Egy fázison képes mérni a feszültséget, áramot, teljesítménytényezőt és a kumulált fogyasztást.
Az adatokat közvetlenül az okosvillanyora.hu felhőbe juttatja MQTT-n keresztül, így a megszokott online felületen követheted a fogyasztásodat.
Ez az üzemmód különösen az 1 fázisú rendszereknél ideális, ahol a teljes háztartás fogyasztása egy fázison zajlik.
2. Ha van P1 portos villanyórád – de napelemes rendszered is van
Ebben az esetben az okosmérőből már megkapod a teljes hálózati adatokat, de nem látod az invertered pontos termelési adatait. A PZIOT-E02 ilyenkor az inverter mérésére használható:
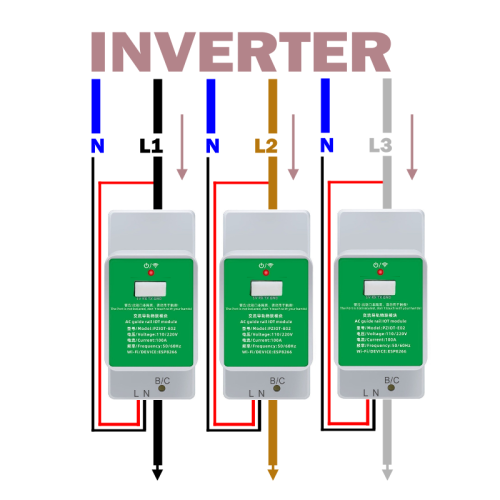
Úgy kell bekötni, hogy az inverterből érkező fázisvezetékre csatlakozzon, még az előtt, hogy azon bármilyen fogyasztó megjelenne.
Így az eszköz az inverter valós kimeneti feszültségét, áramát, teljesítményét és kumulált termelését mutatja – ami nem ugyanaz, mint a visszatáplálás adatai a mérőórából.
Telepítés és összekapcsolás az ADA P1 Meterrel
Telepítéskor a PZIOT-E02-t ugyanarra a Wi-Fi hálózatra kell csatlakoztatni, ahol az ADA P1 Meter is elérhető.
Az indulás után a saját IP-címén elérhető admin felületen egy lenyitható listából kiválaszthatod, melyik fázisra kötötted az eszközt (L1, L2 vagy L3).
Ez a beállítás nem csak egy egyszerű jelölés: ha megadod, a PZIOT-E02 automatikusan megtalálja a hálózaton az ADA P1 Metert, és az API végpontjára átadja a saját méréseit.
Az ADA P1 így a fogyasztásmérőből és a PZIOT-ból érkező adatokat együtt kezeli, és továbbítja az okosvillanyora.hu felhőbe.
Így van két világos felhasználási szcenárió:
önálló fogyasztásmérőként (ha nincs P1 portod),
inverter-mérőként kiegészítésként (ha van P1 portod).
Telepítési útmutató + reset
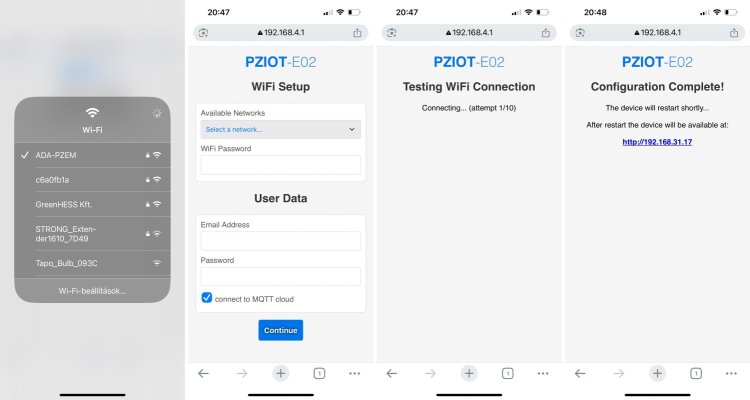
Bekötés - PZIOT-E02 → a gyártói rajz szerint. - Tápfesz, majd a PZEM mérőfejet a kívánt fázisra (L1/L2/L3). A fázist felülről vezesse lefelé. - Célszerű a tápfeszhez külön kismegszakítót beépíteni, hogy az eszköz ki/be kapcsolható legyen. - Első indítás / beállítás - Áram alá helyezés után az eszköz saját Wi-Fi-t hotspot-ot hoz létre ADA-PZEM néven. - Csatlakozz az AP-hoz, nyisd meg a beállító felületet aQR kóddal vagy a böngészőben a http://192.168.4.1 címen (setup). - Add meg a Wi-Fi-t, (ha kell) MQTT-t, e-mailt/eszközjelszót. - Ha van ADA P1 Meter eszköz a hálózaton az MQTT kapcsolatot ne engedélyezd! - Mentés → újraindul, majd csatlakozik a saját hálózatodra (STA mód). - Ekkor a webes felület a helyi IP-n érhető el.
Reset (gyári visszaállítás) Az
elején van egy süllyesztett nyomógomb. Nyomd meg egyszer, röviden,
ekkor a készülék törli a beállításokat és AP módban indul újra a
setuphoz.A PZIOT-E02 eszköz egy IOT eszköz. A firmware a reset gomb
hosszú nyomásával törölhető. Ezért ne nyomd hosszan!
Beüzemelés → Önálló fázismérés (P1 port nélküli mérőknél): 1 fázisú rendszer: - Kösd a PZEM szenzort az egy darab fázisra (L1). - A PZIOT-E02 webes felületén állítsd a kiválasztott fázist (Select: L1). - A helyi UI-n/JSON-on látni fogod a feszültséget, áramot, pillanatnyi teljesítményt és a kumulált energiát.
3 fázisú rendszer - Válassz egy fázist mérésre (pl. L1) és arra kösd a PZEM-et. - (Ha mindhárom fázist szeretnéd külön, ahhoz 3db PZIOT-E02 kell.) - A webes felületen (http://pziot-e02.local) állítsd a fázis Select-et a bekötésnek megfelelően (L1/L2/L3). - A készülék ezután folyamatosan méri és a helyi felületen/API-n szolgáltatja az adott fázis adatait.
Beüzemelés → ADA P1 Meterrel (okosvillanyora.local:8989): Bekötés: a PZIOT az inverter fázisaira legyen bekötve még mielőtt bármilyen más fogyasztó csatlakozna. Helyi hálózat: az ADA P1 Meter és a PZIOT-E02 legyen ugyanazon a WiFi-n(ellenkező esetben nem tudnak kommunikálni). Fázis kijelölése a PZIOT-on: a webes felületen a Phase Select mezőben állítsd be, melyik fázist méri (L1/L2/L3). Adatátadás: a
PZIOT-E02 automatikusan átadja a fázis adatokat az ADA P1-nek (lokális
HTTP-n, okosvillanyora.local:8989 címen) így nincs szükség külön
előfizetésre. Felhő: az ADA P1 ezeket a „plugins” adatokat
beemeli és továbbküldi az okosvillanyora.hu felhőbe – így a
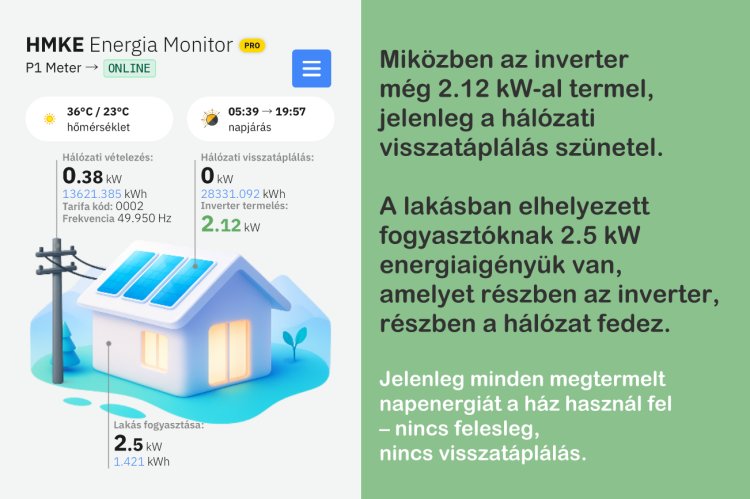
termelés/fázis-szintű mérések a megszokott dashboard-on is megjelennek. A
HMKE.APP-ban automatikusan megjelenik a lakás fogyasztása és az
inverter termelése.
PZIOT‑E02 ↔ ADA P1 Meter integráció
1) Rövid áttekintés
A PZIOT‑E02 egy ESP8266 alapú fázis‑mérő/monitor, ami Modbus‑on olvassa a PZEM modult, majd az adatokat:
saját DSMR/OBIS jellegű „telegram” formában kiadja (HTTP végpont),
opcionálisan MQTT‑re is publikálja,
ha ADA P1 Meter-el használod a telepítéskor nem kell kipipálni az MQTT kapcsolatot!
és HTTP POST kéréssel „plugins” eszközként átadja az ADA P1 Meternek a okosvillanyora.local:8989/write végpontra.
A cél: a P1 mérőn látható legyen az inverter/termelés (fázisonként), és ez bekerüljön az okosvillanyora.hu felhőbe.
A PZIOT minden küldés előtt frissíti a mérést (readPZEM()), majd a
fenti struktúrában küldi az adatokat. A P1 ezeket „plugins” néven
fogadja és beemeli a saját adatmodelljébe/felhőszinkronjába.
10) MQTT publikálás (opcionális)
Topic: dsmr/ (ahol az eszköz MAC‑ből képzett azonosító)
Payload: a v2 JSON.
Retained: igen.
Kapcsolat: a setup során megadott MQTT szerver/port/felhasználó/jelszó alapján.
11) OTA frissítés
Induláskor verzióellenőrzés: ha új firmware érhető el, HTTP update fut.
Hiba esetén nincs factory reset, a készülék megy tovább a régi fw‑vel.
12) Távoli „taskok”
Az eszköz időnként lekérdez egy felhasználóhoz kötött URL‑t.
Parancs példa: resetTotal → belső totalEnergy_kWh nullázása, majd visszajelzés.
A fázismérés svájci bicskája
A PZIOT-E02 kétféle helyzetben adhat hatalmas segítséget:
1. Ha nincs P1 portos villanyórád
Ilyenkor a PZIOT-E02 önálló fázismérőként működik.
Egy fázison képes mérn…
A háztartási méretű kiserőművek (HMKE) tulajdonosai számára
természetes, hogy figyelik a hálózatba történő visszatáplálást. Ez az
érték mutatja meg, mennyi megtermelt energiát nem használ fel a há…
Az elmúlt időszakban egyre több magyar háztartásban vált fontossá, hogy ne csak a villanyszámlát lássák, hanem azt is, mi történik valójában a háttérben. Erre ad választ a debreceni fejlesztésű ADA P1…