SlimmeLezer P1 olvasó összekötése ADA P1 Bridge-el (>1.5.4v) – útmutató
Ez a leírás azoknak szól, akiknek már van egy működő SlimmeLezer (ESPHome‑os P1/DSMR olvasójuk), és szeretnék az ADA P1 Bridge‑et úgy használni, hogy az ne a saját P1 portjáról, hanem a SlimmeLezer által hálózaton publikált nyers telegramból dolgozzon.
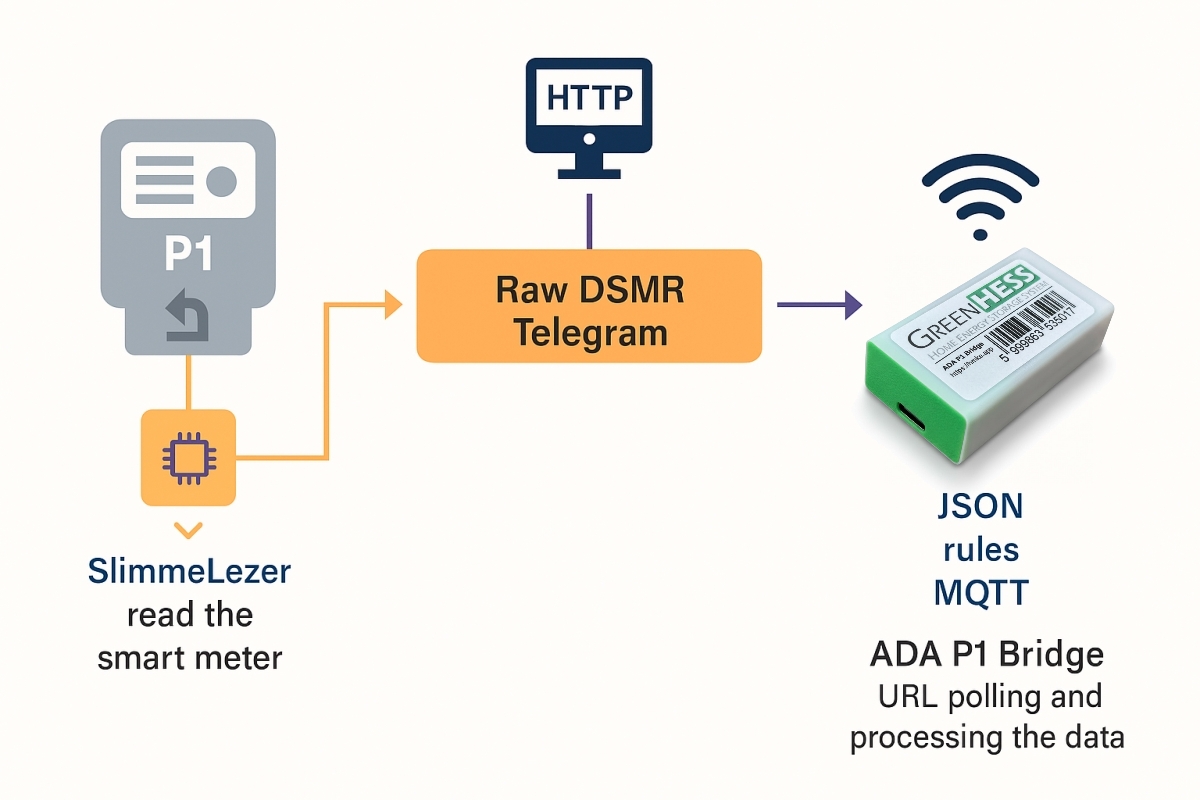
A cél egyszerű:
SlimmeLezer olvas a villanyóráról.
HTTP‑n kiadja a nyers DSMR telegramot.
ADA P1 Bridge (min 1.5.5 verzió) ezt az URL‑t pollolja, és ugyanúgy feldolgozza (JSON, rules, MQTT), mintha a saját P1‑jén jött volna.
Ha ezt végigcsinálod, kapsz egy stabil, „P1‑port nélküli” ADA Bridge‑et, ami tök jól működik akkor is, ha a mérő mellett csak egy SlimmeLezer fér el.
1) Mire lesz szükséged?
Hardver / hálózat:
Egy már működő SlimmeLezer ESPHome firmware‑rel (tipikusan ESP8266 D1 Mini).
Egy ADA P1 Bridge, beállítva Wi‑Fi‑re.
Ugyanazon a helyi hálón legyenek (ugyanaz a router / Wi‑Fi, ne vendégháló, ne külön VLAN).
Szoftver:
ESPHome (Home Assistant ESPHome addon vagy standalone).
A SlimmeLezer YAML konfigurációja.
2) SlimmeLezer teljes példa YAML (copy‑paste alap)
Ha még nincs SlimmeLezered, vagy a mostanit szeretnéd egységesíteni, ez egy jól bevált teljes config. Ezt tedd be az ESPHome‑ba egy új eszközhöz, majd a saját értékeidhez igazítsd (PIN, board, szenzorok).
Fontos: a secrets.yaml fájlra is szükség lesz (az alján mutatom).
Ha a P1 portod titkosított (Belgium, Luxemburg, néhány holland mérő), akkor a kulcsot nem ide írod, hanem Home Assistantben a szolgáltatással adod meg:
ESPHome: slimmelezer_set_dsmr_key
private_key: "32 karakteres kulcs"
3) A nyers telegram végpont (URL) ellenőrzése
Miután a SlimmeLezer online, a web_server automatikusan kirakja a text_sensorok értékeit.
Fontos kompatibilitási megjegyzés: az ADA P1 Bridge nem csak a „sima” szöveges DSMR telegramot tudja megenni, hanem azt is, ha a végpont JSON‑ba csomagolva adja vissza, és abban egy value kulcs alatt van a telegram (pl. {"value":"/…!XXXX"}). Ilyenkor a Bridge automatikusan a value mező tartalmát bontja ki és dolgozza fel. SlimmeLezer esetén ez általában plain text, de ha valami proxy / HA‑s szenzor miatt mégis JSON jönne, ezzel sem lesz gond.
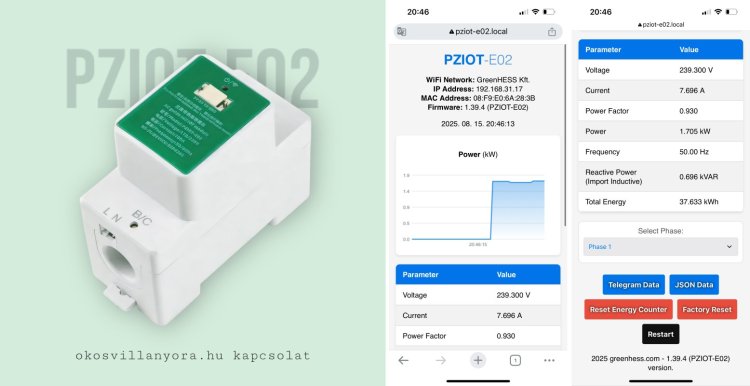
A fázismérés svájci bicskája
A PZIOT-E02 kétféle helyzetben adhat hatalmas segítséget:
1. Ha nincs P1 portos villanyórád
Ilyenkor a PZIOT-E02 önálló fázismérőként működik.
Egy fázison képes mérn…
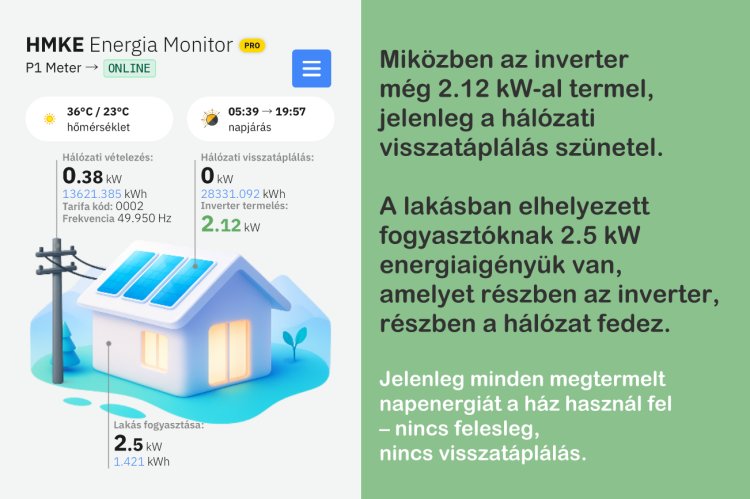
A háztartási méretű kiserőművek (HMKE) tulajdonosai számára
természetes, hogy figyelik a hálózatba történő visszatáplálást. Ez az
érték mutatja meg, mennyi megtermelt energiát nem használ fel a há…
Az elmúlt időszakban egyre több magyar háztartásban vált fontossá, hogy ne csak a villanyszámlát lássák, hanem azt is, mi történik valójában a háttérben. Erre ad választ a debreceni fejlesztésű ADA P1…