ADA P1 Meter Configuration – Step-by-Step Setup with Common Errors
Setting up the ADA P1 Meter is basically quick and simple, especially if you follow along with the video.
The video is here (copy it into your browser):
The new ADA P1 Meter (V2) hardware comes with some minor changes, but the configuration logic and process remain the same: the goal is still to ensure the device connects reliably to the proper 2.4 GHz WiFi at the electricity meter and is later linked with your account.
1) Don’t set up in a warm room – do it at the electricity meter
In setup mode, the ADA scans for available WiFi networks. Here comes the classic trap:
-
A WiFi network may still be visible in the house, but it is not visible or very weak at the electricity meter.
-
There have been cases where someone selected a network inside the room that was no longer reachable at the meter, and of course the device then could not connect.
So: go to the meter and do the setup there.
2) Bring the WiFi password with you (seriously)
In setup mode, the device creates its own WiFi hotspot, named:
-
hmke.app
This hotspot is stable only within a few meters. If you walk back into the house to get the WiFi password during setup, there’s a good chance that:
-
the connection will be lost,
-
the setup interface will be dropped,
-
and you’ll have to start over.
I’m not exaggerating: this is one of the most common reasons for “why won’t it work???”
3) Connect to the hotspot
-
WiFi network: hmke.app
-
Password: 12345678
4) The setup interface opens automatically (if not, do it manually)
Normally, a few seconds after connecting, the phone will display a blue-background setup page.
If it doesn't launch automatically, open your browser and enter:
5) “No internet” warning
Important: this hotspot does not provide internet, it is only for device configuration.
Therefore, your phone often indicates no internet connection.
Some phones “smartly” switch at this point to a saved WiFi or mobile network that has internet.
And that is exactly what we do not want.
✅ During setup, always check that you remain connected to the hmke.app hotspot.
6) At the end of setup comes the verification – if there's an error, you are returned to the main page
At the end of the setup, the system verifies whether the provided WiFi SSID and password combination works.
-
If there is a typo, wrong password, or the network is not reachable:
it goes back to the main page, and the process starts over.
This is not a “freeze” but a protective logic: it restarts rather than remain in a half-finished state.
7) Special warning: the 5 GHz WiFi "same name" trap
Some routers run both 2.4 GHz and 5 GHz bands under the same SSID name.
Since the ADA P1 Meter only works on 2.4 GHz, having both bands under one SSID can cause confusion.
Suggestion:
-
rename the 5 GHz SSID in your router or disable it (at least during setup).
8) After successful setup, the device restarts
If everything is okay, at the end of configuration the device will restart.
This is normal and necessary: it restarts cleanly with the new WiFi settings.
hmke.app Registration – Where Most Misunderstandings Occur
The next step: registration on the hmke.app website (also included in the video).
Very important rule:
✅ The system will only work if you use exactly the same email address and password on hmke.app as you entered during device setup.
This is the “link key.” If they do not match, the two will not “find each other.”
What if the passwords don’t match because you forgot one of them?
1) If you know the hmke.app password but entered a different one in the device
The simplest solution:
-
Perform a factory reset on the ADA P1 Meter
-
then reconfigure it, entering the password you used on the website.
2) Why there is no password reminder?
It’s important to know: the system stores passwords in an encrypted, non-reversible form.
This is secure (and required), but comes with a limitation:
-
Password reminders cannot be sent because there is no “original password” to retrieve.
In other words: users really need to remember what they set. (Yes, this is strict, but it also prevents leaks.)
3) If you know the password in the device but don’t remember the hmke.app password
In this case, changing the password is only possible by deleting the account.
What to do:
-
Send a deletion request from the email you used to register to:
info@hmke.app -
Customer service will delete the registration within 24 hours,
-
then you can register again with a correct new pairing.
If you don’t insist on the old email:
-
You can choose a different email address, register with that,
-
and change the ADA P1 Meter to use that as well.
HMKE.APP – Why is it simpler?
The hmke.app is simpler in this regard, because it directly accesses the ADA P1 Meter, so no separate hmke.app registration "linking" is needed.
-
You can immediately log in with the email + password pair stored in the device.
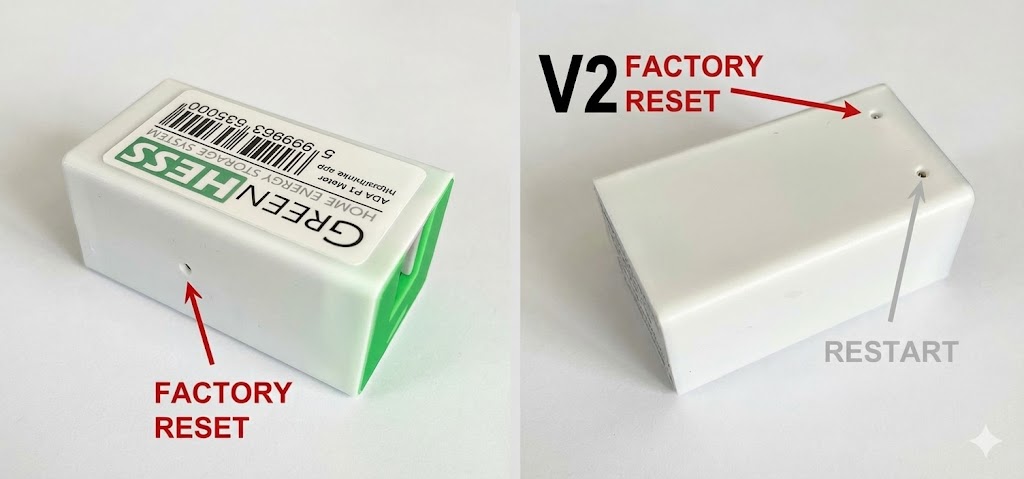
ADA P1 Meter (V2) – Location and Operation of Reset Buttons
On the ADA P1 Meter V2, the location of the reset button(s) has changed:
-
On the earlier version, the reset was on the side,
-
but on the V2 it is at the bottom.
The V2 has two buttons on the bottom:
-
Rightmost: Restart
-
Leftmost: Factory Reset
Factory Reset Operation (same on both versions)
To perform a factory reset:
-
Hold down the Factory Reset button for about 10 seconds,
-
keep holding it until the blue LED flashes 3 times,
-
this indicates the factory reset has started / completed.